The Art of Canning

First, a history…
Historically speaking, Canning is a relatively recent invention compared to more ancient methods like salting, curing, and drying to preserve food.
Interestingly enough it was Napoleon Bonaparte who initiated the race for innovative food preservation to feed his traveling army in 1795. “An army travels on its stomach,” Napoleon famously said. Since fresh food spoils quickly, food borne illnesses were a real threat to an army already worn thin on meager resources. Napoleon sought a solution to prolong the shelf life of local produce as and when it became accessible. Nicholas Apert responded to his government’s military dilemma by cooking food in a glass jar to sterilize it and then sealing it. Thus, canning was invented!
However, the genius of his technique was not known at Apert’s time. One hundred years later, Louis Pasteur would discover more about this technique and why it works. Microorganisms that form as food spoils are killed during the sterilization process; when food is sealed correctly during the sterilization process it can further minimize exposure to spoiling agents from the environment.
In present times, we too rely on canned foods for reasons including military use, camping, air and ground travel, stocking the pantry, and emergency provisions. But now, there’s more to canning food than to safeguard future provisions. In many parts of the world, people use canning to preserve recipes that are family favorites to enjoy later, prepared with care at the height of the ingredients’ freshness.
Canning is a time-honored tradition in many cultures with a strong social component, bringing families and communities together.
Italy is known for its famous Ragu sauce made frequently with Roma tomatoes. India is known for its sweet and savory pickles using a variety of seasonal fruit and vegetables including mango, limes, and eggplant. Korean Kimchi is a canning favorite. And in many Nordic countries as well as Russia (places that endure long and cold winters) canning offers a wonderful way to enjoy summer varieties of fruit and vegetables in the colder months.
People are becoming more and more conscious of what is put into their food, especially preservatives. Canning at home offers an alternative to store bought canned goods as our focus shifts to eating more local and seasonal produce. Homesteading is gaining popularity here in the U.S. in both urban and suburban areas; Canning is a practical way to utilize the surplus of home or community garden.
Canning is relatively easy to learn and can be done even if just as a hobby. It is regarded as a serious science by some, requiring finely calibrated equipment and exact measurements, but with a bit of knowledge and research you too can start your canning journey.
Keep in mind that acidic fruit and vegetables are more forgiving than those which have a higher pH (less acidic) because they spoil less quickly. Acidic foods like tomatoes can be boiled but more alkaline foods need to be pressurized with special equipment for additional safety. Some people are picky about preserving the color of their produce which is easily done with natural ingredients like lemon juice, powdered citric acid and vinegar. An article posted on the Gainesville times website (referenced here) explains nicely the basics of canning.
Here in New Jersey where Abma’s farm is located, there is a vast Italian American population that have continued their annual tradition of making and canning tomato sauce (gravy) at the end of summer. Popularly known as “Tomato Fest”, this day long canning tradition brings many local families to the farm in search of their favorite tomatoes which include Jersey, Roma and Paisano varietals. Roma are fleshy tomatoes with few seeds, optimal for making sauce whereas Paisano are more acidic and fare better during canning.
If you’re considering canning but need some more motivation, take into account that some vegetables and fruit including tomatoes, peppers and apricots become more nutritious after cooking. This is because Lycopene, a powerful phytonutrient, becomes more bioavailable after heating. In this way, canned produce offers immune boosting options that do not need refrigeration, travel well, and can come in handy for easy weeknight dinners or supplement lunch boxes for additional flavor.
Check out our tried and true recipes for canning tomato puree and peeled whole tomatoes, created by Abma’s very own Head Chef, Tee:

| Servings |
|
- 12 lbs tomato ripe
- 4 tbsp salt kosher
- 4 tbsp lemon juice bottled
- 4 quart jar with lids and rims; sterilized
Ingredients
|
|
- Wash empty canning jars in hot, soapy water, and rinse them thoroughly. Or run them through the dishwasher.
- Place jars in boiling water. Cover the jars with hot water; bring to a simmer over medium heat.
- Let the jars simmer for 10 minutes. When you're ready to start filling, place the jar on a clean kitchen towel to prevent slipping.. Let jars air dry.
- Wash tomatoes. Cut into pieces. Place in a large stockpot over low heat.
- Wash tomatoes. Cut into pieces. Place in a large stockpot over low heat.
- Add 2 teaspoons of salt and cook, stirring often approximately every 5 minutes until half of the water evaporates.
- Stir regularly to prevent sticking to the bottom. When tomatoes are cooked and approximately half the water has evaporated the tomato will start to separate from the skin.
- At this step, pass the tomatoes through a food mill or processor.
- Wash the pot. Place tomato puree in the pot and add remaining salt, bring to a boil, stirring often. Simmer until desired thickness.
- Add 1 tablespoon lemon juice per quart jar.
- Ladle tomato puree into jars while still simmering on the stove. Quickly cover with lid and rim, and tighten.
- Cover the jars with a clean cloth and allow them to cool at room temperature.
- Test the seals to ensure proper processing, label the jars with the date, and store in a cool, dark place (like a pantry) to enjoy for up to a year.
Recipe by Tiziana Conte, Abma's Farm Head Chef
| Servings |
|
- 12 lbs tomato ripe
- 4 tsp salt kosher
- 4 tbsp lemon juice bottled
- 4 quart jar with lids and rims; sterilized
Ingredients
|
|
- Wash empty canning jars in hot, soapy water, and rinse them thoroughly. Or run them through the dishwasher. Place jars in boiling water.
- Cover the jars with hot water; bring to a simmer over medium heat.
- Let the jars simmer for 10 minutes. When ready to start filling, place jars on a clean kitchen towel to prevent them from slipping. Let jars air dry.
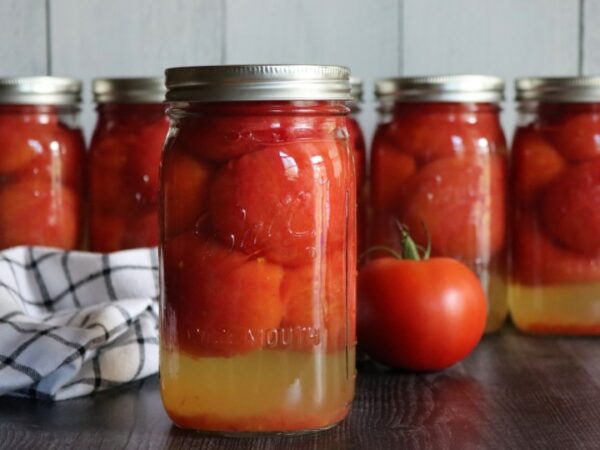
- Start with firm, unblemished tomatoes, and wash them well in cold water.
- To remove the skins, dip tomatoes in boiling water for 30 seconds or until the skins start to split. Immediately place the tomatoes in cold water.
- When cool enough to handle, remove the skin and core with a paring knife or manually. If desired, cut the tomatoes in half and remove seeds at this time.
- When filling the jars pay attention to headspace as overfilling or underfilling the jars will negatively affect the seal during processing. To overcome this challenge, use a wide-mouth funnel in the cleaned quart size canning jar to get the liquid level just right.
- First ladle whole or halved tomatoes into the jars, along with any juices from preparing the tomatoes, pressing to fill spaces with juice.
- Next use the funnel to add bottled lemon juice and salt (1 tablespoon lemon juice and 1 teaspoon salt for quarts). Leave ½-inch headspace.
- Once the jars are filled, wipe the jar rim with a clean, damp towel to remove all traces of food. Food on the rim prevents a perfect seal.
- Position the prepared lid and screw band on the jar and tighten according to the manufacturer's instructions.
- Set each jar into a canner or large pot as it fills with water. The jars should not touch. Cover the pot.
- Process the tomatoes in boiling-water for 85 minutes. Begin timing when the water starts boiling.
- Carefully remove the jars from the pot. Cover the jars with a clean tablecloth, and allow them to cool at room temperature.
- Test the seals to ensure proper processing, label the jars with the date, and store in a cool, dark place (like a pantry) to enjoy for up to a year.
Recipe by Tiziana Conte, Abma's Farm Head Chef